
Record Cold Temperatures in a Quinzhee
I am a long-time Winter camping enthusiast. It’s beautiful being outside in the Winter, and I really enjoy the challenge and sense of satisfaction that comes with knowing how to live outside in the cold. However, I do not like being cold.
“How many rabbits have you seen sitting by a fire to keep warm?”
My record low overnight trip happened a few years ago while volunteering as an instructor at Northern Tier High Adventure's Cold Weather Leader Training School. How cold was it? It was so cold, the governor of Minnesota cancelled school for the entire state—a rare occurrence in a state with residents who pride themselves on handling the harshest of Winters with ease!
Our school defied orders and carried on. We slept on a frozen lake, a few miles from the state's northernmost border—just a stone's throw from Canada. Temperatures in the Boundary Waters region had been right around -40 (Fahrenheit and Celsius meet at -40) with the windchill at -75F. I remember that night well because I woke up uncomfortably HOT! Sweating, in fact. Why? One reason was my sleeping shelter, a quinzhee. The other reason was that my concern about the temperatures caused me to overdo it with my sleep system. I’d doubled up two thick sleeping bags and layered on my down parka as an extra blanket before cinching up my mummy bags and turning in.
The Quinzhee
"Quinzhee" (also spelled "quinzee") is the Athabaskan name for their traditional snow shelter. The design is somewhat similar to an igloo, but quinzhees can be constructed without the windswept and hard-packed snow required to cut blocks for an igloo. They’re built by mounding up snow, letting it harden, and then hollowing out the inside. Inside a well-built quinzhee, an occupant’s body heat (and maybe a candle or two) can maintain temperatures just below freezing. "Just below freezing" might not sound that great, but when it's -40 outside, that means it's 60-70 degrees warmer inside the quinzhee!
To Quinzhee or Not to Quinzhee?
Quinzhees aren’t for the faint of heart. So, before you decide to tackle one, let's take a look at some of the pros and cons of quinzhees.
Pros
Warm. Relatively. Snow is an excellent insulator, and can keep you much warmer than the outside air when temperatures dip below zero. The thick, solid, quinzhee walls also eliminate windchill factor. While a tent heated with a wood burning stove can reach much warmer temps and provide a nice dry environment, they offer essentially no insulation, and the interior will cool off to outside temperature as soon as the fire in the stove dies down. “Hot tent” campers need to decide whether they will feed the fire all night (some danger here) or warm up before turning in and then fully rely on their sleeping bag system for nighttime comfort. A quinzhee offers a stable temperature all night long.
Strong. A well-built quinzhee is very strong. We often take pictures with a whole patrol of Scouts standing on top of their quinzhee the morning after sleeping in it. There’s little need to worry about heavy snowfall or wind collapsing a well-built quinzhee.
Quiet. The first time you slide into a quinzhee and out of the howling wind, you'll be surprised how quiet and peaceful it is inside!
Fun. Most people find great novelty in sleeping in a snow shelter on a Winter night! Kids, in particular, love building snow shelters and sleeping in them. I remember my first night out in a quinzhee on a frozen northern lake over 30 years ago, and how I took pride in telling all of my buddies about the experience.
Free. Good Winter tents are not cheap. There's no mortgage on a snow house. For the price of a good shovel and some sweat equity, you can have your own fortress of solitude for the night!
Cons
Laborious. A quinzhee is hard work. It takes a lot of shoveling to make a 2-3 person quinzhee. Judging from the amount of griping I hear from people about shoveling driveways, exerting the effort required to build a quinzhee probably isn't everyone's idea of a fun time. Energy management is important on any wilderness trip, but even more so on a Winter trip when you’re relying on your body for critical warmth. If you're not in good shape, accustomed to hard physical work, and well-nourished and hydrated, building a quinzhee will be a challenging task—one that could leave you physically depleted and, therefore, cold.
Time. Compared to setting up a tent, it takes quite a bit of time to build a quinzhee. I don't know if I've seen a quinzhee go from ground breaking to move-in ready in less than three hours. With short Winter days, this does not leave much travel time during the day. At our recent Northern Star Council BSA’s Winter Camping School, three or four of us helped a father-son team shovel for about an hour to make the initial snow mound, and then it took at least another half hour for the hollowing out process. Quinzhee building is best done as a team project with plenty of time and energy available. That father and son slept comfortably in the quinzhee through the night with outside air temperatures dropping to -25F.
The quinzhee is often depicted as a survival shelter. In fact, while teaching at Northern Star Council BSA’s Winter Camping School, a participant who’d been a truck driver shared how he spent a night in a roadside quizhee when his rig was caught in a North Dakota blizzard years ago. Quinzhees can be survival shelters, in the sense that it can offer a safe haven from dangerously cold conditions, but due to the amount of time and effort needed to construct a proper quinzhee, I do not think it should be relied on as your sole emergency shelter.
Wet. Moisture management is a key priority when Winter camping. With quinzhee camping, you're battling the two great threats: internal and external moisture (getting soaked from the inside when you’re sweating while digging out the quinzhee), and wet on the outside from all the contact with the snow during the digging out process.
It’s a good idea to pace yourself while digging so you don’t overheat. It’s an excellent idea to combine that strategic pacing with the right clothing system.
Side note about clothing: When I’m hot tenting and using a tent with a wood-burning stove, I like wool clothing with cotton wind layers (we’re often warned against cotton clothing in the outdoors, but in very cold and dry conditions cotton make for an excellent wind layer. It should still never be used for wicking or insulation layers though!), as well as down for high loft insulating layers. However, when I’m “cold camping” in snow shelters, I prefer fleece, synthetic insulation, and Gore-Tex-type shell layers. This type of synthetic clothing doesn’t absorb moisture and can (potentially) be dried out with body heat. Wool won’t melt and is therefore better when drying in front of a fire or wood burning stove is an option, but I find it doesn’t dry as easily with body heat alone.
Psychological challenge. When wriggling into a quinzhee, you’re out of the wind and immediately sense the calm and quiet. However, after struggling to get into my sleepwear and zipped into my sleeping bag(s) inside the tight quarters, I can't help but feel like I'm lying in an MRI tube. When the lake ice starts booming and cracking underhead, as it does on cold northern lakes, it can be a bit unnerving inside the perfectly blackened quinzhee interior. The reality is that there is very little to worry about, but it often makes me feel claustrophobic, which is not typical for me.
*In the Boundary Waters Canoe Area Wilderness, where I love to Winter camp, the U.S. Forest Service requests that people camp on the frozen lakes in the Winter instead of the shore campsites. The idea is that this allows the shore campsites to "rest and recover." Sleeping on the lakes is often the windiest, lowest lying, and coldest place to camp. There can be issues with overflow slush on the lakes, too. On the plus side, it does make for a nice flat surface, which is easy to shovel and walk on—especially compared to the BWCA woods that are choked with deadfall and thick forest.
Quinzhee Building
Step 1: Plan and Prepare
The first step in quinzhee building is to outline the shelter. The most precise method would be to have the occupants lie on the ground and measure needed space. To allow for the thickness of the walls (and less than exact precision when excavating), you'll want to build your mound about 1.5 feet wider than the outline of the sleeping space needed for your occupants.
Stamp down the area that will be the walls of the quinzhee. You do not want loose or crusty snow beneath the walls that might give way as the weight builds.
To help reduce the total amount of snow you need to dig and pile up, you can place unneeded packs in what will be the center of the quinzhee. I've heard that heavy-duty trash bags filled with air will work to provide a foundation for the mound, but I’ve never tried this method. In an emergency, you can cut conifers and shrubbery and pile them in a mound in the center of the structure. Just remember to place the bases of all the trees and shrubs at the foot of your intended door area, so they’re easy to remove after the quinzhee is constructed. It’s also a good idea to cover the brush pile with a tarp or poncho before piling all of the snow on top of it.
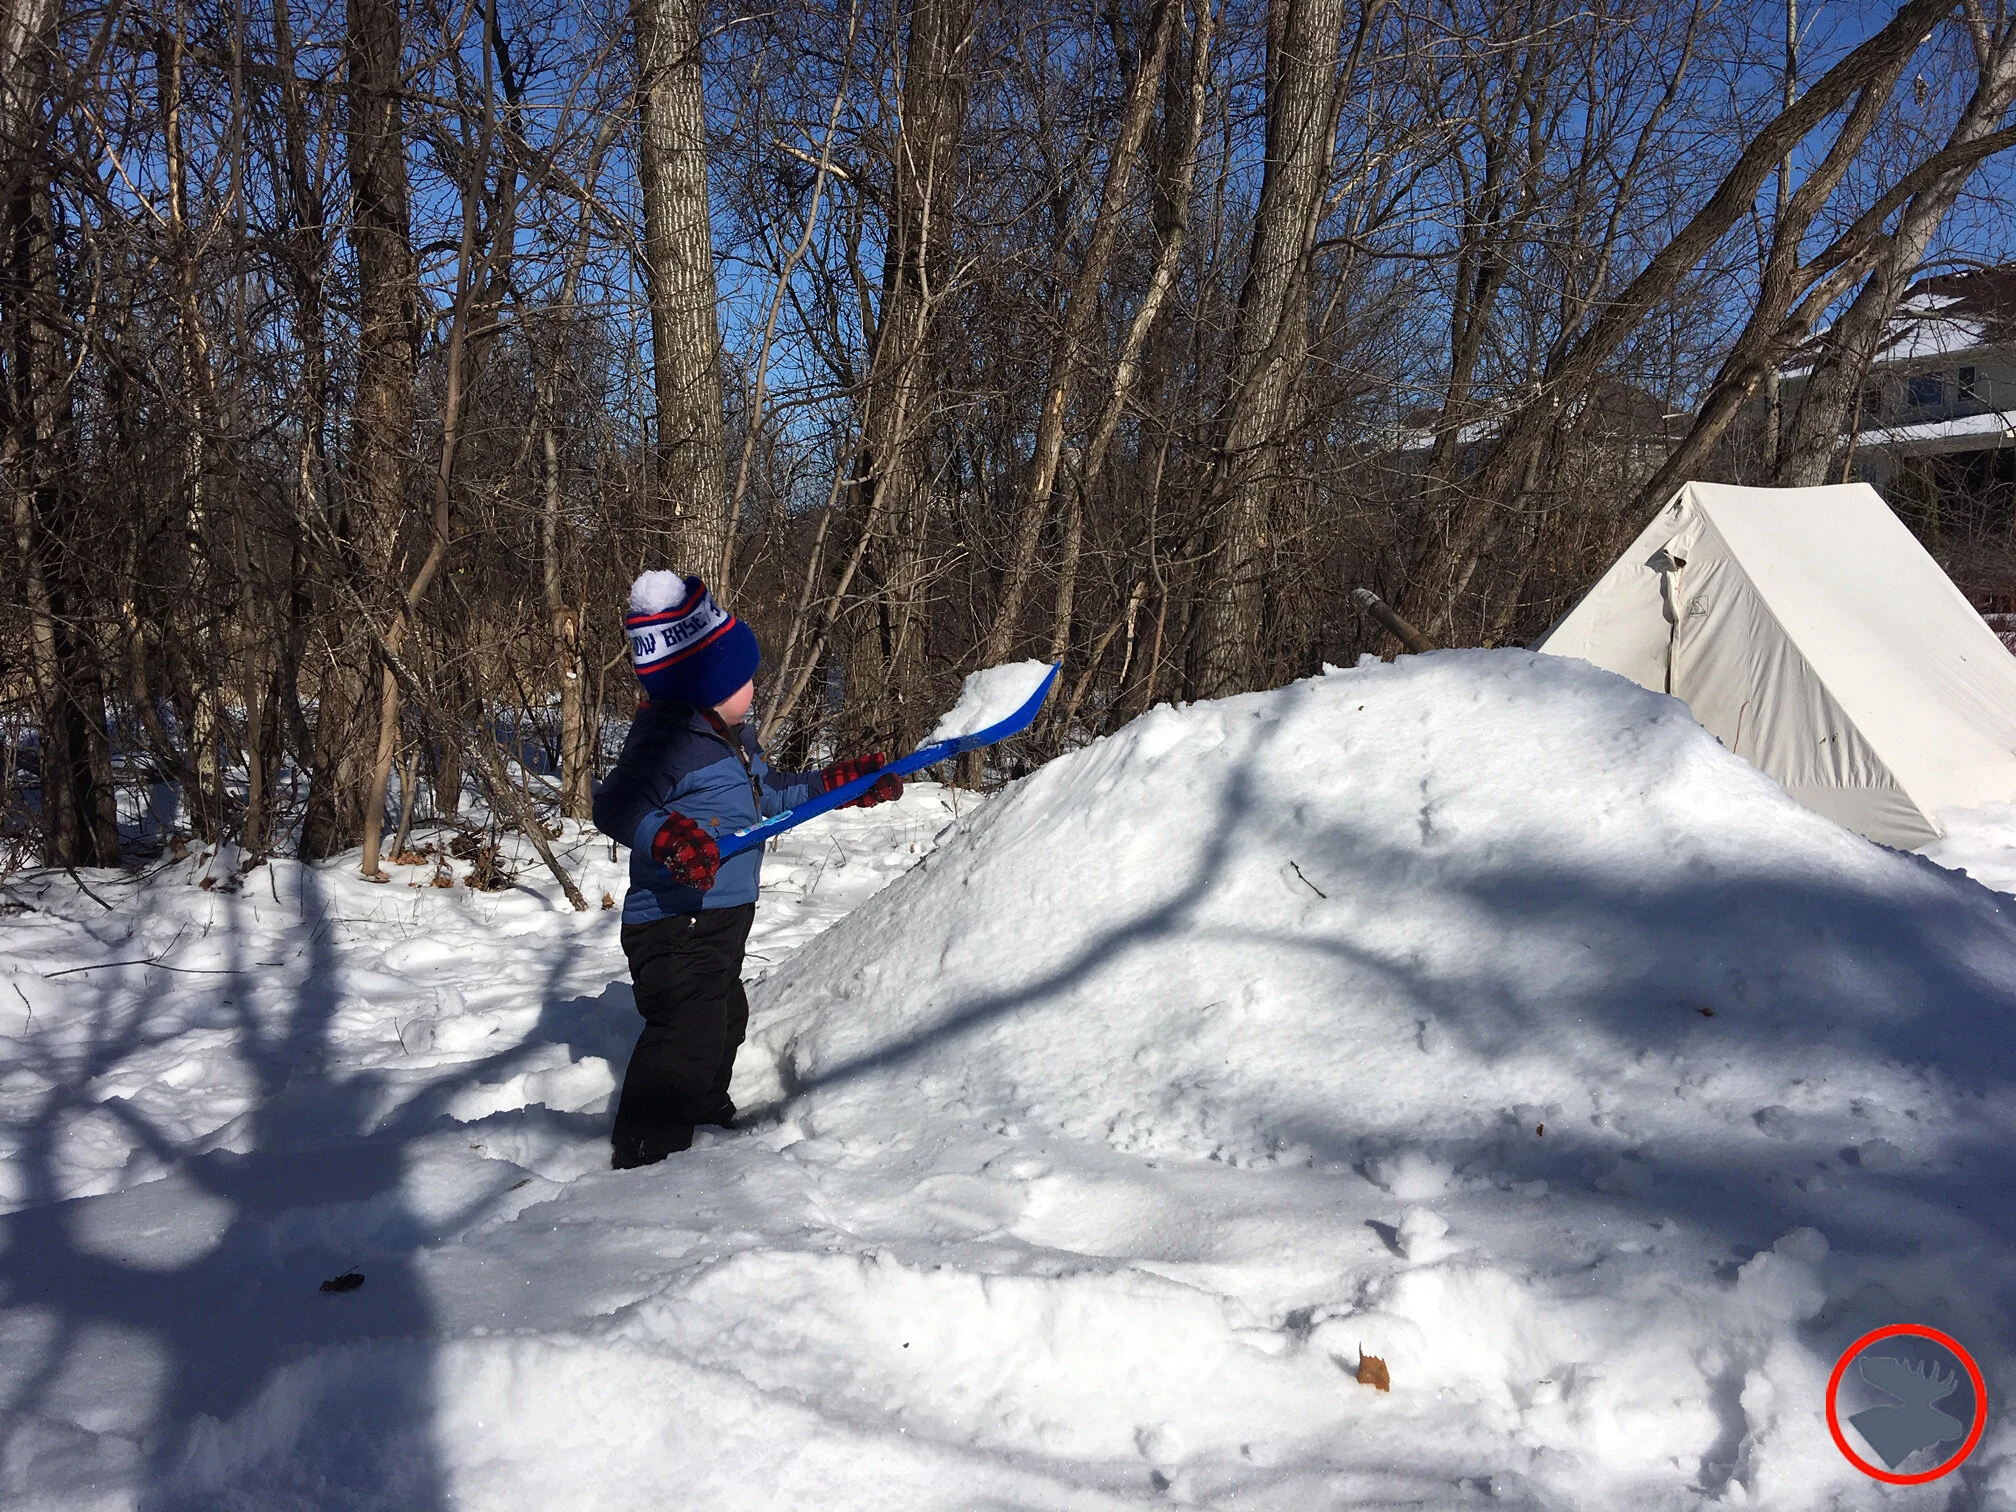
Step 2: Heap It Up
Next, start digging! You'll want to pile up a mound about six feet tall. This is one of those times when having a trusted camp shovel on hand is key. I like to have a few different types of shovels in a crew: a few big grain scoop shovels, a small collapsable mountaineering shovel for excavation, and, if camping on lake ice, regular long-handled driveway-type shovels are handy for scraping up snow along the lake's surface. Some of the top bushcraft instructors have their students make and use hand-carved wooden shovels of a native design. Major style points if you go this route!
As you begin to shovel and pile up your mound, place a tall pole exactly in the middle of the mound to serve as a marker later when you are excavating the mound.
When you’re shoveling snow and piling it up, put any large chunks of hardened snow or ice in the middle of the pile, where they will eventually be excavated when you hollow out the inside of the quinzhee. Do NOT use this type of snow for your walls. This hard snow won’t compact and become part of the wall; it will break off and potentially compromise your entire quinzhee, which could be just as dangerous as it would be disheartening to see your quinzhee cave in after all your hard work.
As you shovel up your mound, it's good to lift and toss up the snow to help it separate in the air. This is more work, I know, but that toss and separation can help in the crucial "sintering" (fusing of snow crystals) process, which gives the structure its strength. Stirring the snow before heaping it on the quinzhee mound can also help.
Step 3: Sintering
“The strength of a snow-house is dependent upon a combination of cold and warm snow particles. In the process of making the mound, when the snow is exposed to the colder air, a rapid recrystallization of water vapor cements the particles. To allow time for such metamorphosis to take place, the snow-house builder should wait at least one hour before he begins to excavate the inside.”
Sintering is the name for the process whereby the powdered snow coalesces into a solid mass. Sintering is key to a well-built quinzhee because it is literally the make or break factor!
After tossing snow onto the mound and allowing time to pass, sintering happens naturally. Using the backs of your shovels to beat down or "work harden" the mound can help speed up the sintering process. Some people claim that you should not work harden the snow. They think it may reduce the insulative properties of the quinzhee; however, NOLs, with their extensive experience, recommends work hardening snow shelters. I’ve made quinzhees using both methods, and I’ve never noticed a significant warmth difference in the final product between work hardening the snow or not work hardening the snow.
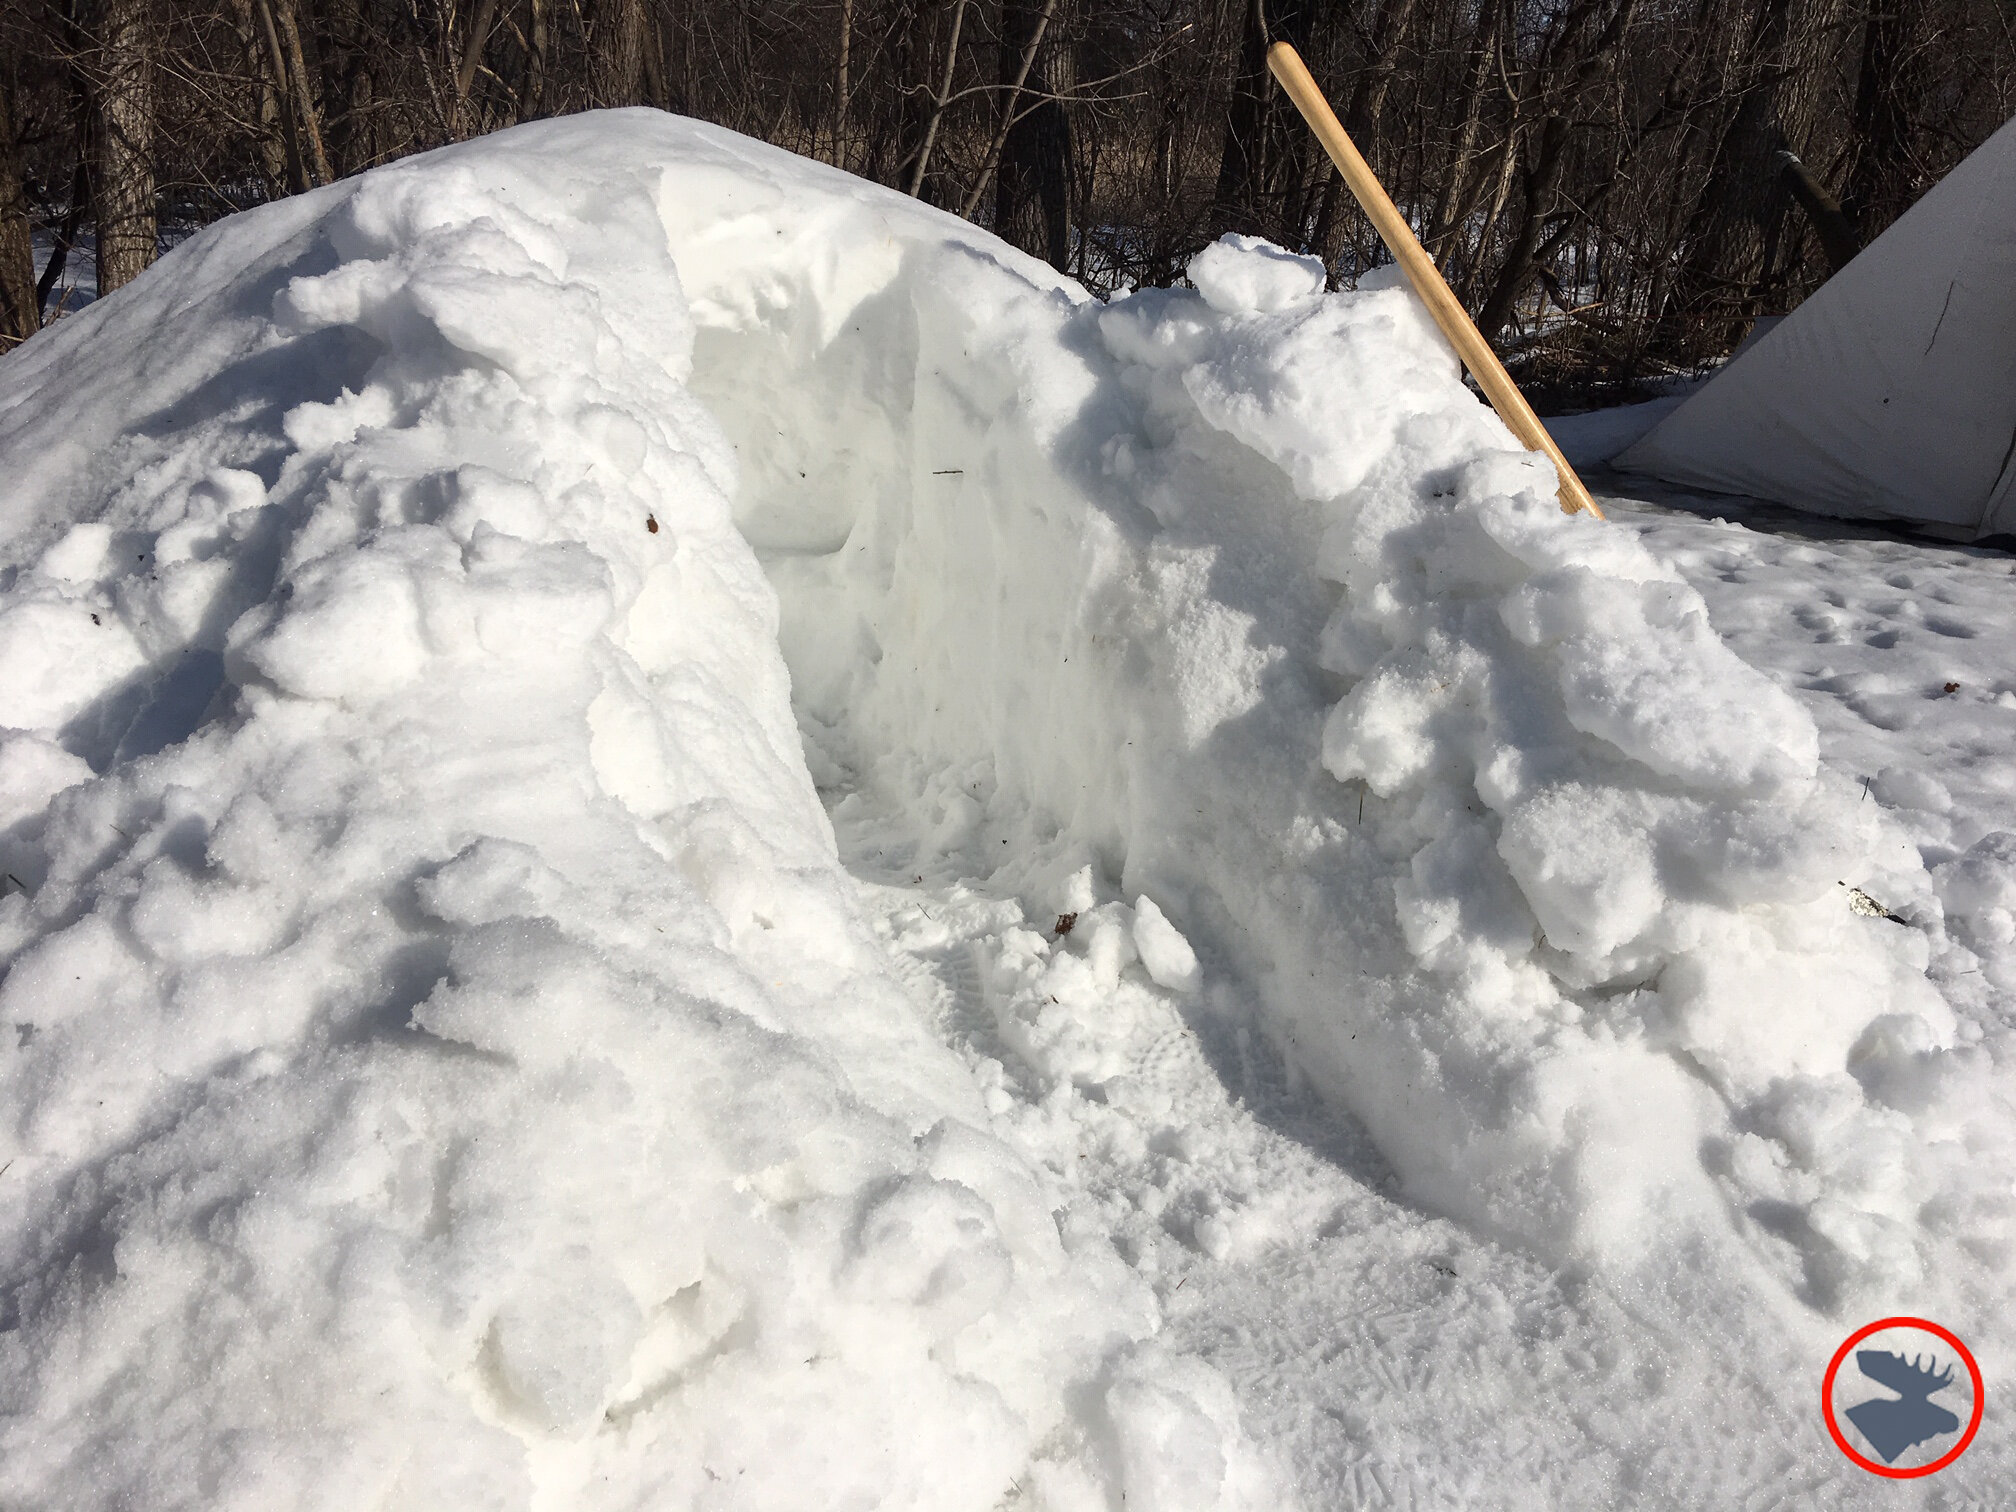
Before the mound fully hardens, "porcupine" the mound by shoving two-foot sticks into the mound with regular spacing. When digging out the mound from inside, the tips of these sticks will help gauge wall thickness.
Now, like placing a cake in the oven, the waiting game begins. The sintering process can happen fairly quickly with warm snow, but it will take much longer with cold and dry snow. Some people say that the quinzhee can be ready to dig out after half an hour, but I've found it usually takes at least twice that time. You can use your shovel to take a test slice where you'll put your door to see if the snow has firmed up and the structure will stand when being dug out. I recently heard a Scout instructor at the Ely base say they were told to wait five hours before digging out. This seems quite a bit longer than necessary in my experience in that region, but they do often have very cold and dry conditions and are probably erring on the side of caution.
While you're waiting, it's a great idea to rehydrate, eat, dry off, and stay warm by a fire. You can also work on other camp tasks, such as preparing your evening meal.
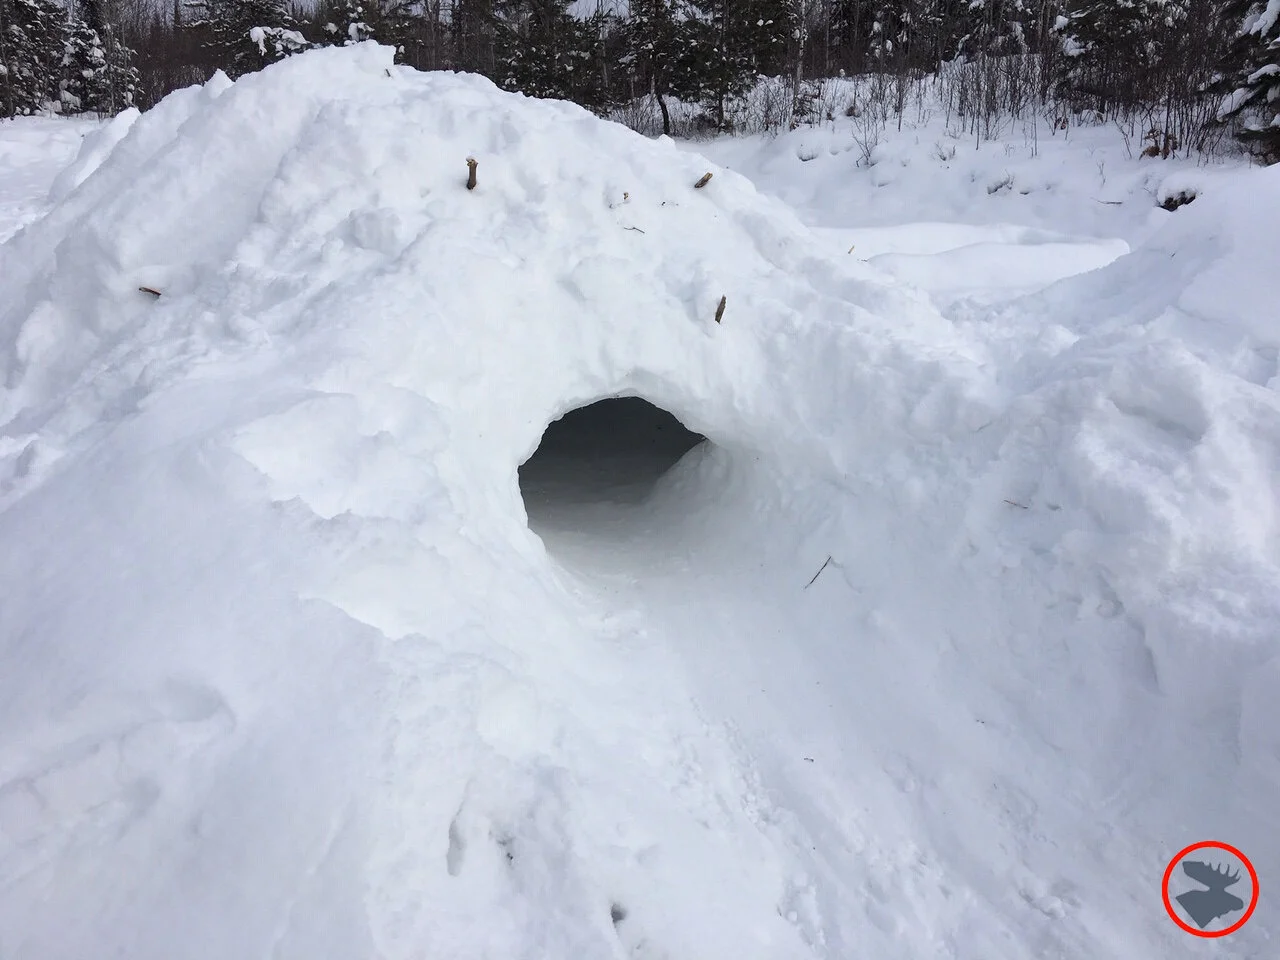
Step 4: Excavation
When you've tested your quinzhee mound and determined that it's solidified, it's time to begin excavating and hollow out your snow house.
Hollowing out the quinzhee can be wet work, both from sweat and from brushing against the snow. Care should be taken here to avoid getting your primary insulating layers wet. Knees, elbows, and hands are particularly at risk. Getting snow down the back of your neck is also a risk! Once you've begun digging, it makes sense to remove extra layers and just wear your wind layer or rain suit while digging. A closed cell foam "shortie pad" is a great asset for the "mole" (the lucky camper who gets to dig out the quinzhee) because it offers a dry place to kneel while digging out the quinzhee.
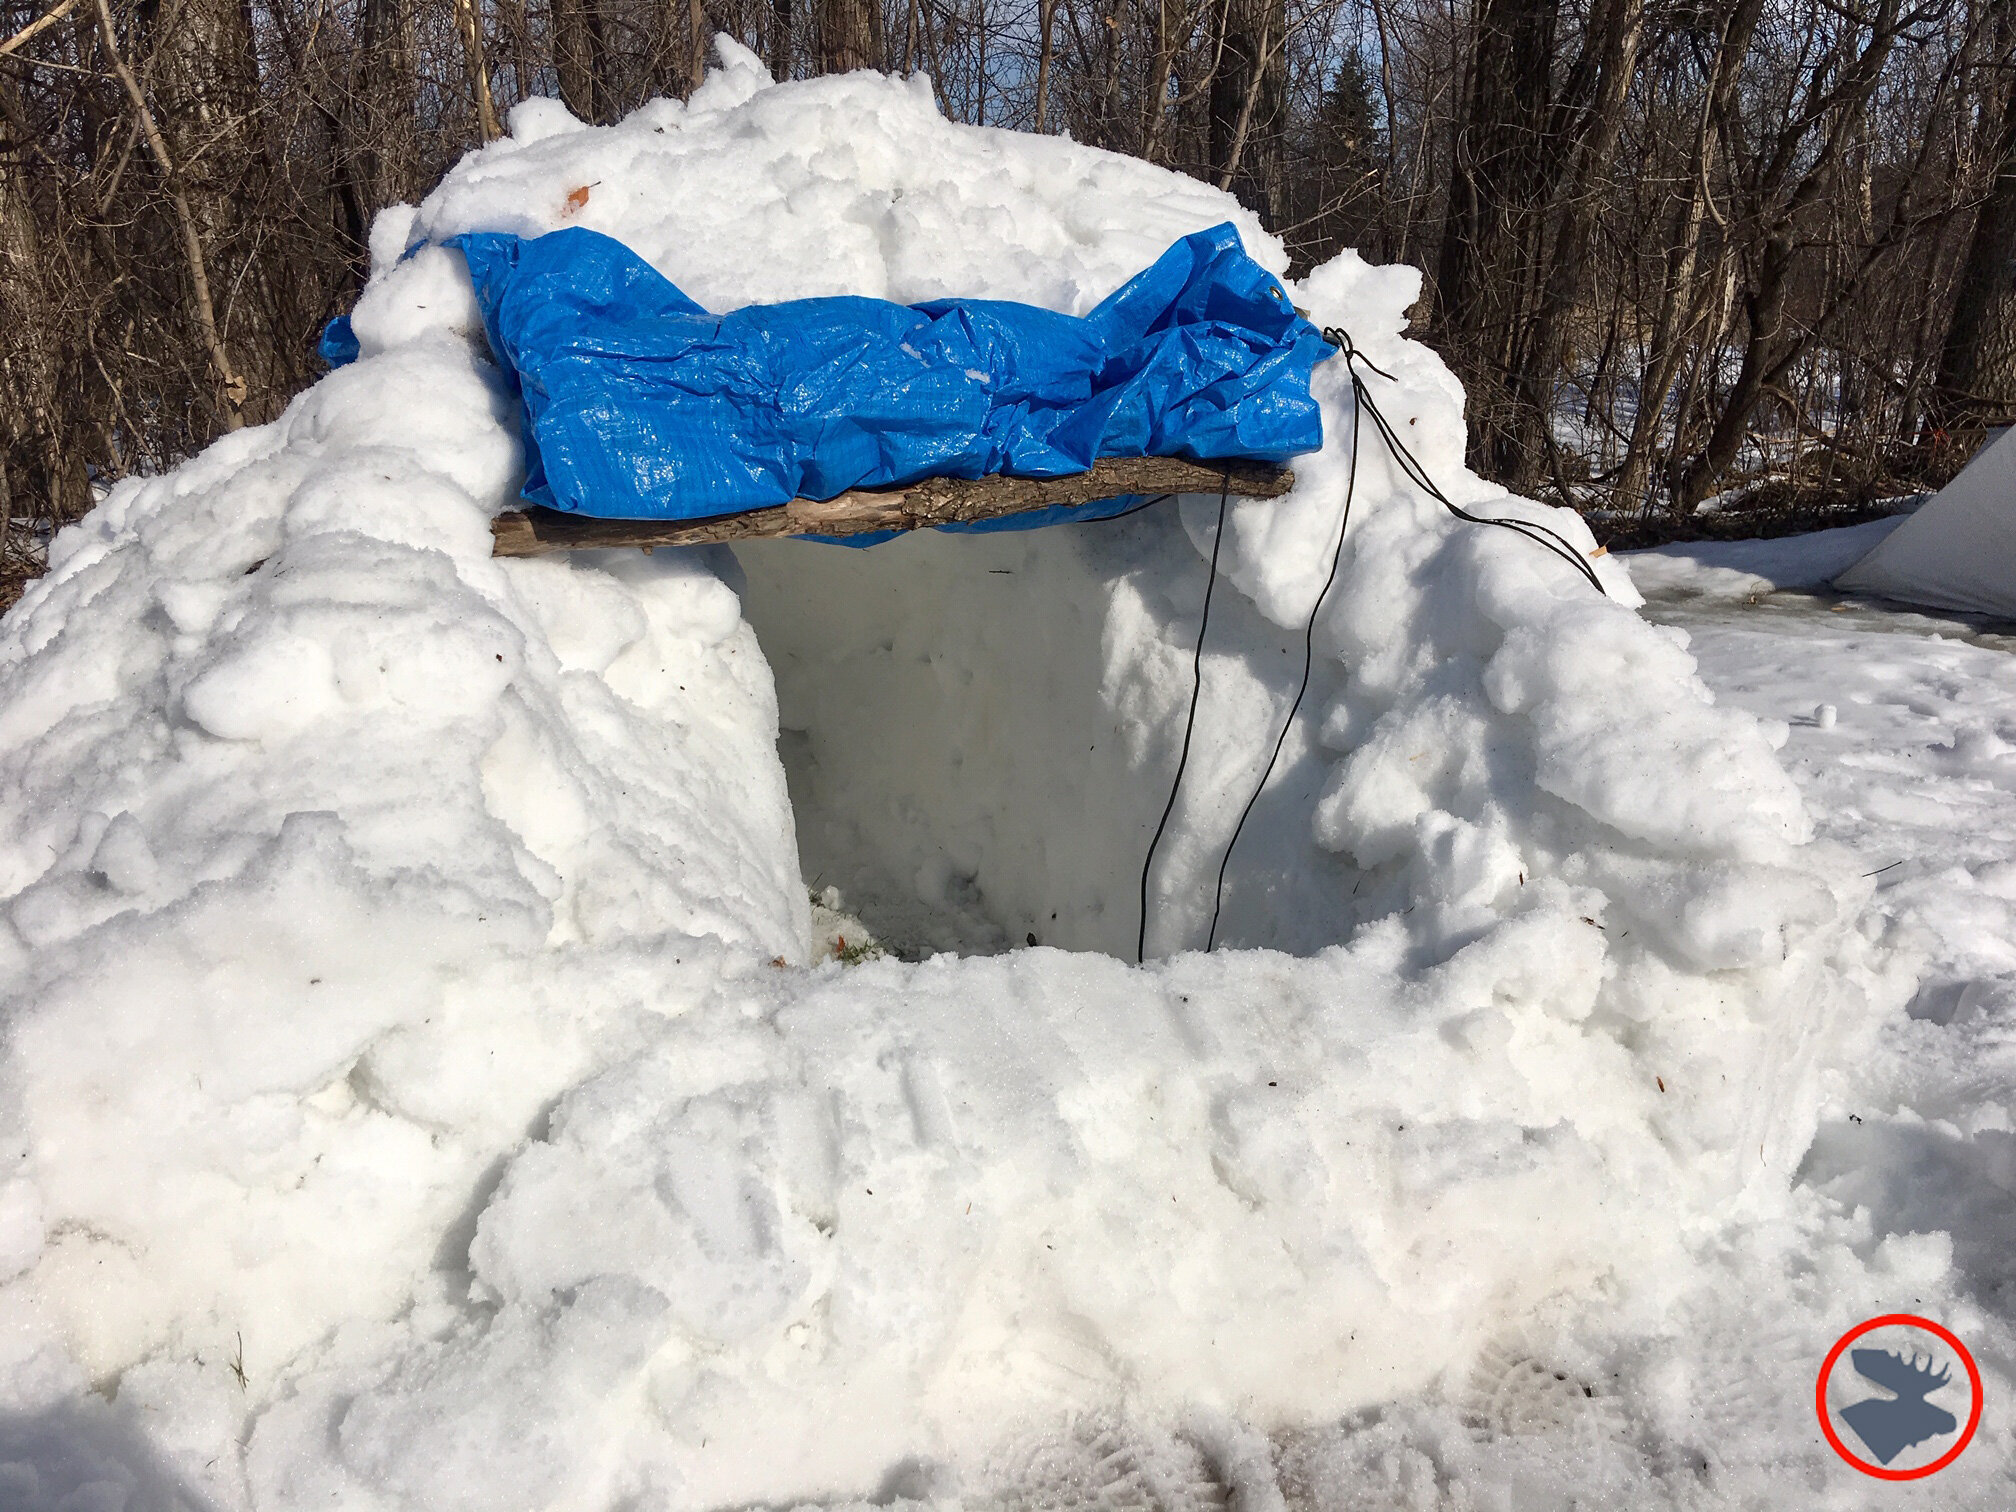
You want to begin digging an entrance hole on a side that is 90 degrees to the prevailing winds. You don't want wind coming straight in your entrance, and if you make your doorway on the opposite side of the mound, winds will blow over the top and can cause snow to swirl in or drift snow in front of the doorway and close it off.
The entrance should be a low tunnel. Dig into the mound about two feet, and then begin digging upward. The walls should be about 8”-24” thick. They can be thinner near top compared to the base. As the mole is digging, he should watch for the tips of the two-foot sticks inside the mound. Those indicate the ideal wall thickness, which means it’s time to stop digging in that area. Also, on sunny days, the mole may be able to begin seeing a blueish tint to the snow as it gets thinner.
The mole will need a short and maneuverable digging implement. Small and collapsible mountaineering or ice fishing shovels are great, as is the SnowClaw or a large kitchen pot. These digging tools should be kept inside and with the mole in case of collapse. Aim to make the interior walls as smooth as possible to prevent dripping points which can form on points and edges.
As the the mole digs, an outside person should assist by hauling and removing the excavated snow on a sled. Just slide the sled inside the quinzhee, the mole fills it up, pull the sled out, and use the diggings to build a wind wall extending from the entrance hole. A tarp or foam sleeping pad can also be used to pull out the mole's diggings.
Once the quinzhee is excavated, you need to vent the quinzhee using a couple of two-inch holes near the top of the quinzhee and above the entrance. Be sure to regularly check the vent holes for blockage, especially if you’re using a well-sealed door. The vent hole is a standard safety recommendation and can help minimize condensation issues, however I know of at least one very experienced winter guide who says it’s unnecessary and makes the shelter colder, as the quizhee’s snow walls are porous, and there’ll be some air exchange from the doorway.
Key safety tip: Someone on the outside should carefully monitor the mole's progress in the event of a quinzhee collapse. It has happened, and the outside crew needs to be ready to quickly help extract the mole from this mini avalanche!
Excavation Alternatives
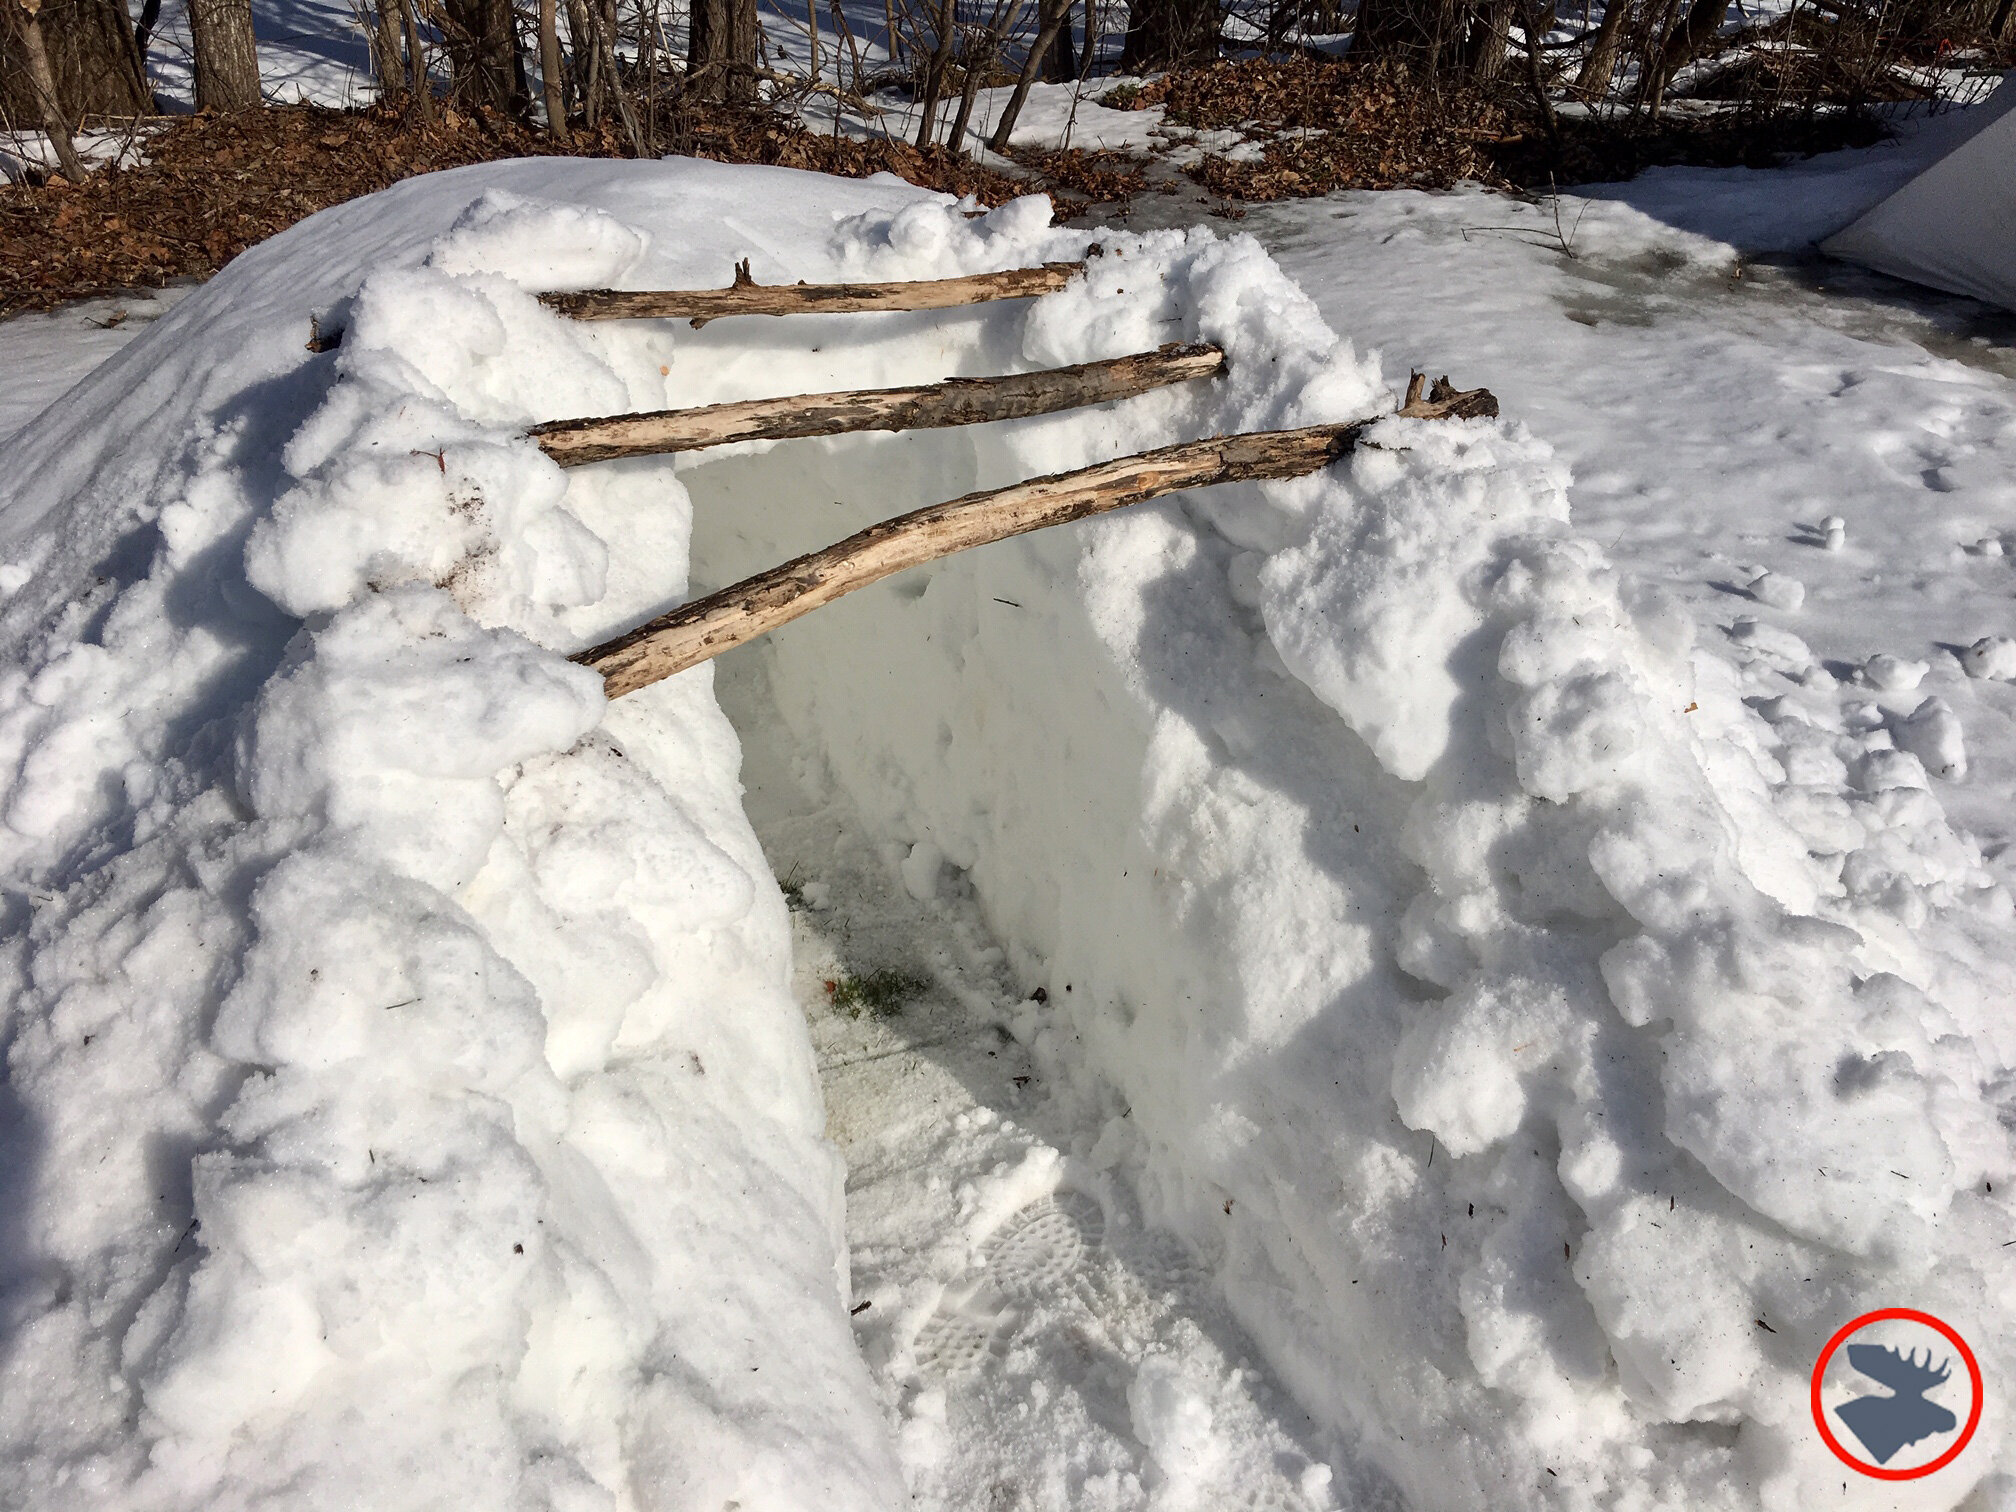
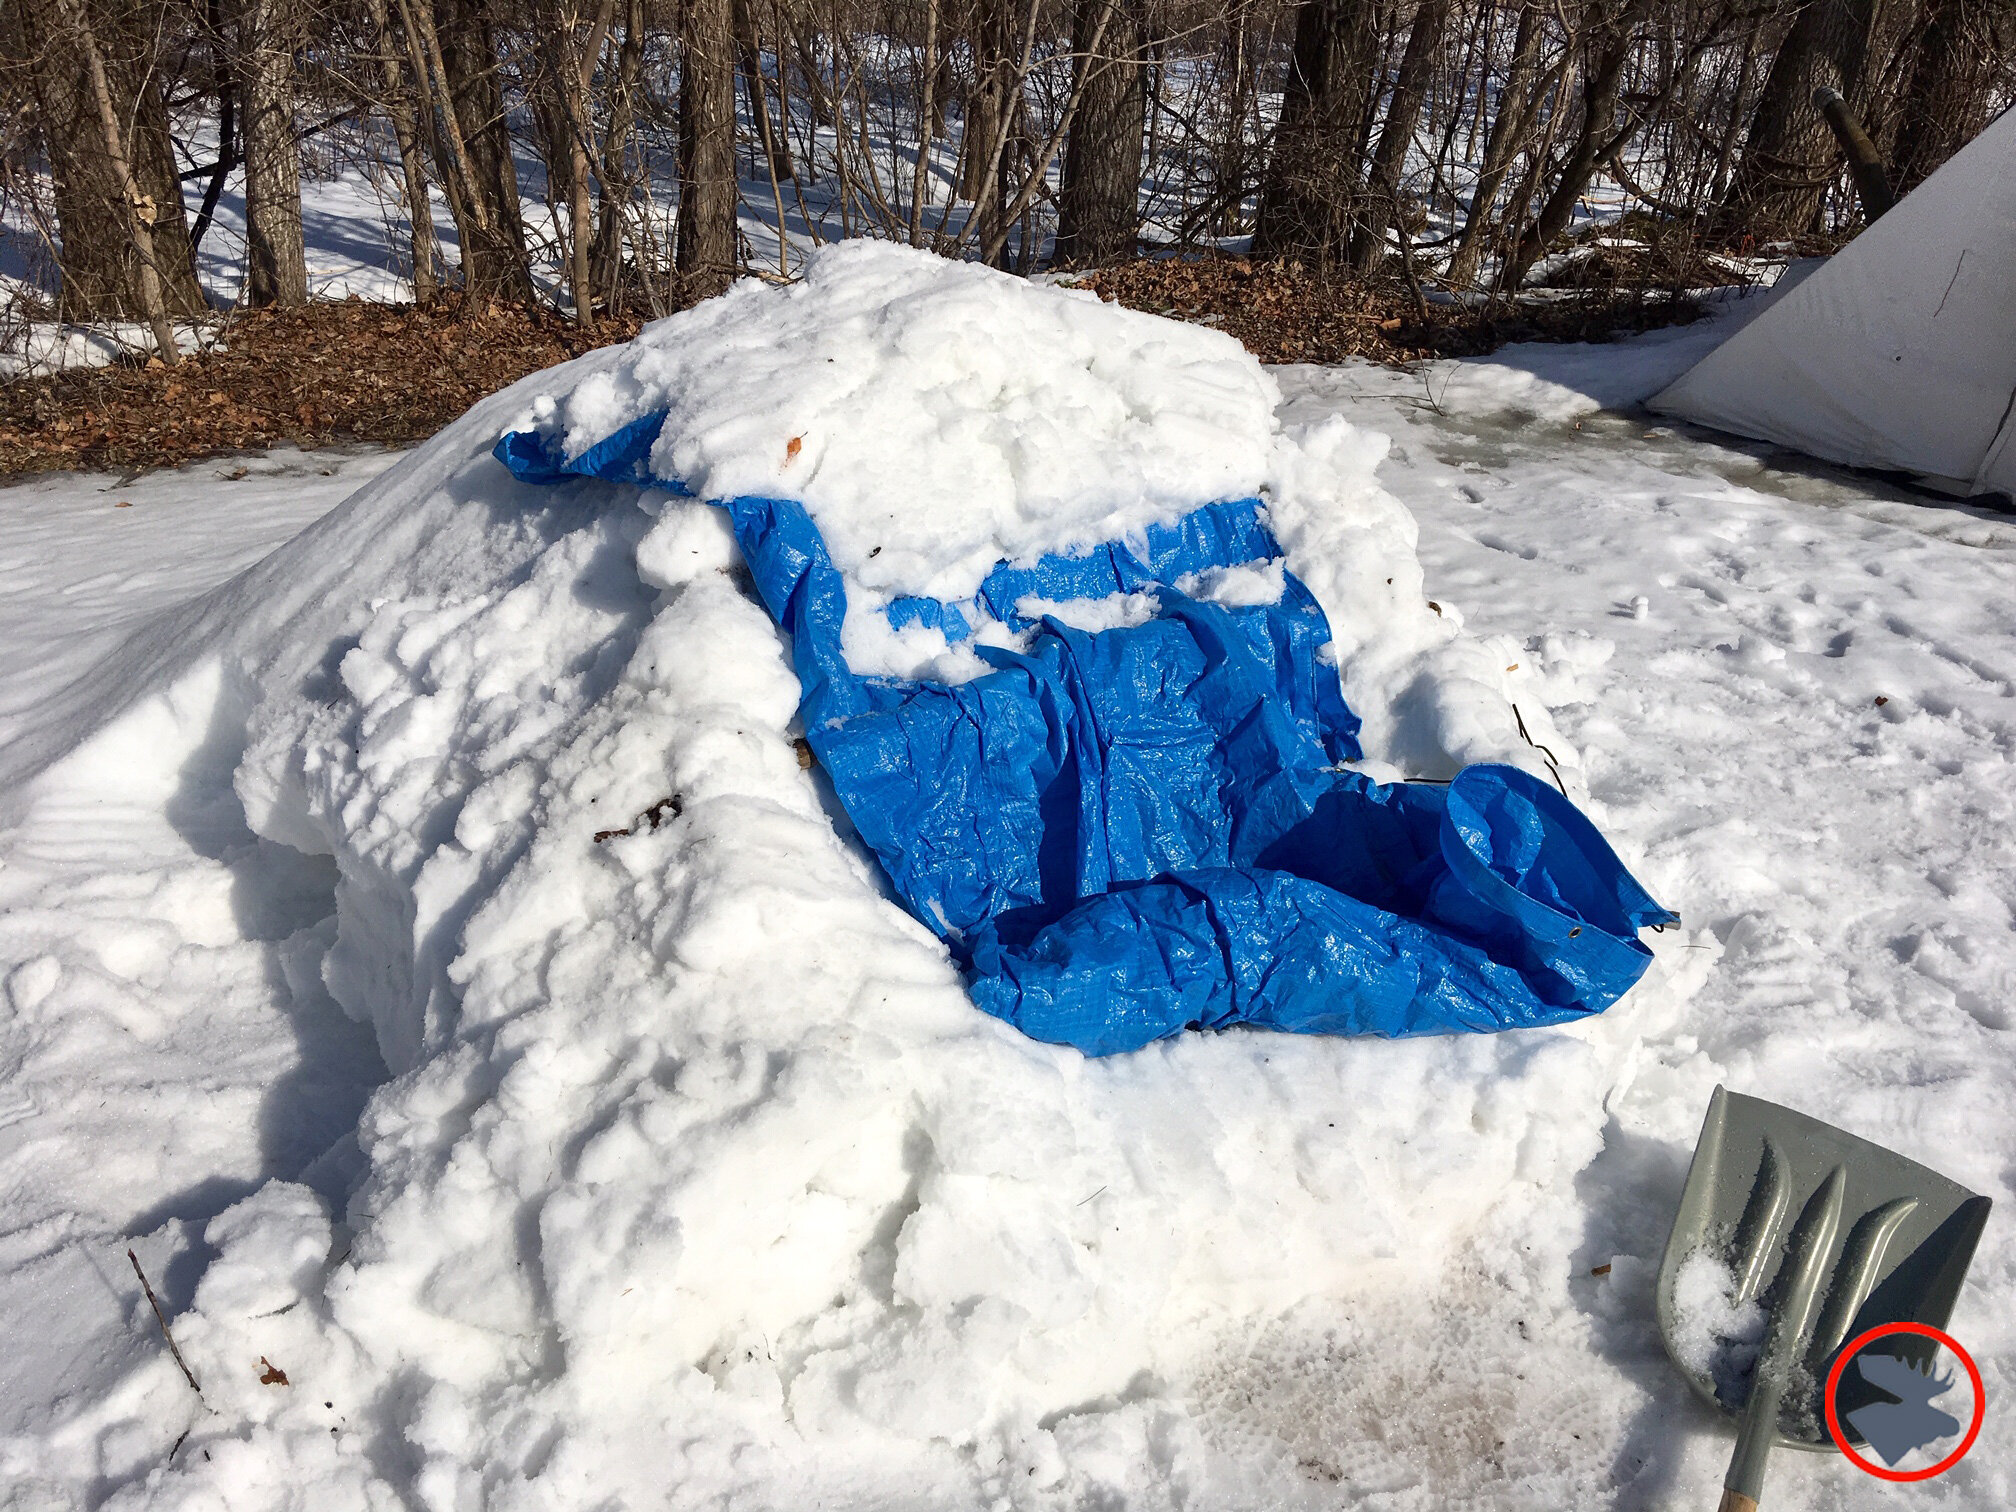
I have been experimenting with using an “extraction slot” to dig out the quinzhee (check out the photos below). I first came across this term in Monty Alford’s excellent Winter skills books. While the typical quinzhee technique requires digging a small hole and having one person "mole" their way in by scooping and hollowing out the inside, this is sweaty work. You are brushing against snow and there is a risk of a cave-in. Using an extraction slot allows you to stay on your feet and dig a shoulder-width slot into the mound, so you can walk into the center of the mound. After you’ve dug your extraction slot into the mound, you can then scoop out the interior of the mound relatively easily, and while standing or hunching, rather than crawling and kneeling. After the mound is fully excavated, you then rebuild the portion of the wall and ceiling you cut out, leaving only the standard-sized entrance hole. You can do this with snow blocks, or by cutting sticks for rafters to bridge the gap, covering them with a tarp, and then at least 8” of snow.
Another great advantage of the extraction slot technique is that you can cut out frozen blocks from the guts of the pile and use them to build up the entryway. Instead of simply scooping out the insides in small crumbles, the extraction slot method offers a usable snow block quarry available from the hardened snow in the middle of the pile. Some blocks may be a bit ragged, since they were cut out with a shovel, but they’re still useful for building an entryway and rebuilding the ceiling.

Cool Tips!
In addition to shovels, a machete and folding saw can be helpful tools. Both can serve as snow knives for cutting blocks, and also for harvesting wood for firewood and quinzhee rafters if you use the extraction slot technique.
When possible, try to dig a cold well and, ideally, have a raised sleeping shelf. The best design has the sleeping platform above the level of the entrance.
Plug the doorway. There are many things you can use: a trash bag filled with snow, a tarp wrapped around snow, packs and gear, or a plug cut out of blocks of snow. I’ve also used a wadded up plastic tarp, which doesn’t provide much insulation, but does stop most airflow.
If your quinzhee is sagging after a number of days, it may be possible to add fresh snow to the top of the shelter and then carve out the inside of the roof again.
A candle or two burning inside can help raise the temperature, remove some of the frosty humidity inside the shelter, and create a nice ambiance!
If you’re sleeping on land instead of ice, scraping down to bare earth can lead to a warmer shelter. Even though the frozen ground is much colder than your body, and you’ll want to sleep on thick insulating pads, Earth’s molten core is emitting heat that can be trapped in your insulated shelter. Even in the dead of Winter, when Ely, Minnesota is well below zero, the ground in that area is radiating heat at about 20F!
If you are using a quinzhee in an emergency/survival situation, be sure to place some visual signals outside your shelter. Quinzhees can be hard to spot, and with their soundproof walls, you likely won’t hear rescuers!
Key to Quinzhee Success: Practical Approach
If you live in a snowy region, it's a great idea to practice making your first quinzhee in your backyard. This way, you can baby-step your way into the idea of sleeping outside with below-freezing temperatures in a snow shelter. The same can be said for testing your Winter sleep system inside your quinzhee: experiment close to home where you have an easy emergency bailout! Practicing at home will also give you a realistic idea of how long it takes you to build a good quinzhee and the physical effort involved before you plunge headlong into the Boundary Waters or some other remote and wild place in the Great White North!
No matter where you build your first quinzhee, remember to have fun in this true classic of the northern woodlands!